Running ChipWhisperer on a M1 Mac with a VM
ChipWhisperer is some really nice ecosystem to learn and experiment with hardware side-channel and fault injection attacks on all kinds of embedded chips. I’m using the ChipWhisperer-Nano to get familiar with power side-channel attacks.
ChipWhisperer provides a bunch of tutorials in the form of Jupyter Notebooks to run all kinds of side-channel attacks and fault injection attacks. Their documentation describes how to install this software and get up and running with the ChipWhisperer hardware. Unfortunately getting this software to fully work on my M1 Mac was not so straight forward for me. After trying both the native installation process and the VirtualBox image and both not working (the VM crashed immediately). I decided to build my own virtual machine to run the ChipWhisperer software in. This post describes the build process for this VM.
Choosing the hypervisor and base image
There exist a lot of hypervisor software for macOS. VirtualBox is a very popular open-source one. For Mac, especially machines with an Apple Silicon CPU, my favorite hypervisor is UTM which is free if downloaded from their site.
The official VirtualBox image of ChipWhisperer is based on Debian 11, so I chose the preconfigured Debian 11 image from UTM’s image gallery. After downloading it the VM should be ready to start. The default configuration should be fine. I installed updates and rebooted the VM just to be sure.
1
sudo apt update && sudo apt upgrade
The default user and password is debian. Let’s change that with passwd. The default root password is password so I also changed that one.
1
sudo passwd root
Installing the ChipWhisperer software
The following is almost an exact copy of the official installation instructions for Linux machines. Make sure to check that page because it will have to most up-to-date commands for the most recent version of the software. If I changed a command it is indicated with an info box like this one.
Required packages
We have a bunch of prerequisites for building Python from pyenv:
1
2
3
4
sudo apt install build-essential gdb lcov pkg-config \
    libbz2-dev libffi-dev libgdbm-dev libgdbm-compat-dev liblzma-dev \
    libncurses5-dev libreadline6-dev libsqlite3-dev libssl-dev \
    lzma lzma-dev tk-dev uuid-dev zlib1g-dev curl
And some prerequisites for building the firmware for the targets:
1
2
sudo apt install libusb-dev make git avr-libc gcc-avr \
    gcc-arm-none-eabi libusb-1.0-0-dev usbutils
Most ChipWhisperer versions consist of two parts: the scope and the target. The target is the chip that runs the code we want to attack. This means that we need to build and flash the firmware for this target every time we change the code that runs on the target.
Python
In the documentation they use pyenv to install and manage different Python installations. This is the first time I’ve used pyenv and for what I’ve seen so far I like it a lot. The first step is to grab pyenv:
1
curl https://pyenv.run | bash
Next, we need to add the following to our .bashrc file, so that pyenv starts properly:
1
2
3
4
5
6
7
echo 'export PATH="~/.pyenv/bin:$PATH"' >> ~/.bashrc
echo 'export PATH="~/.pyenv/shims:$PATH"' >> ~/.bashrc
echo 'eval "$(pyenv init -)"' >> ~/.bashrc
echo 'eval "$(pyenv virtualenv-init -)"' >> ~/.bashrc

#apply these changes to current terminal
source ~/.bashrc
Now we can install Python, in the documentation they recommend version 3.9.5 so that is the one we’ll use:
1
2
3
pyenv install 3.9.5
pyenv virtualenv 3.9.5 cw
pyenv activate cw
Now we have a Python environment called cw that we’ll be using for all the ChipWhisperer’s software.
ChipWhisperer
We start by downloading ChipWhisperer from Github.
1
2
3
git clone https://github.com/newaetech/chipwhisperer
cd chipwhisperer
git submodule update --init jupyter # grab Jupyter notebook tutorials
Next, we need to copy some default udev ruleset so that we have permission to access USB and serial devices. Which is how we’ll connect the ChipWhisperer hardware.
1
2
sudo cp 50-newae.rules /etc/udev/rules.d/50-newae.rules
sudo udevadm control --reload-rules
In the official documentation they copy the rules from
hardware/50-newae.rulesbut in my case they were in the main directory.
Those rules give permission to the chipwhisperer group, so we need to create that group and add our user (debian) to that group:
1
2
3
4
sudo groupadd -f chipwhisperer
sudo usermod -aG chipwhisperer $USER
sudo usermod -aG plugdev $USER
sudo usermod -a -G dialout $USER
Because of some permission errors when updating the firmware of the ChipWhisperer I needed to add the line
sudo usermod -a -G dialout $USERhere as described in the documentation.
Now we need to restart the virtual machine again.
After rebooting and moving in the cloned directory (cd chipwhisperer) we can finally install ChipWhisperer:
1
2
python -m pip install -e .
python -m pip install -r jupyter/requirements.txt
I also installed nbstripout, which will make git and jupyter interact a little nicer:
1
2
3
cd jupyter
pip install nbstripout
nbstripout --install # must be run from the jupyter folder
In the notebooks they use
%matplotlib notebookto display dynamic plots, but that did not work for me. A workaround I found was by replacing%matplotlib notebookby%matplotlib widgetbut this required me to install theipymplpackage:
pip install ipympl
Now everything should be ready to start the software.
Running the software
In the documentation they run the notebook simply with:
1
jupyter notebook
This works if you want to access the notebook from a web browser inside the VM, but I want to access it from a web browser on my host machine because that works just a little nicer for me. To make Jupyter open to the host we need to provide it with the IP address of the VM which we can easily find as follows:
1
hostname -I
In my case this is 192.168.64.6. Now we can start the notebook as follows and go to the URL that is displayed in the terminal from a web browser on the host Mac.
1
jupyter notebook --ip 192.168.64.6 --port 8888 --no-browser
A convenient run script
Let’s put all the required commands to run the notebook after the VM boots in a single run.sh file that can be conveniently executed after logging in to the VM.
1
2
3
4
5
6
7
8
9
10
11
12
13
14
15
16
17
18
19
#!/bin/bash

# Paths for pyenv
export PATH="~/.pyenv/bin:$PATH"
export PATH="~/.pyenv/shims:$PATH"
eval "$(pyenv init -)"
eval "$(pyenv virtualenv-init -)"

# Activate our cw Python environment
pyenv activate cw

# Go to the chipwhisperer directory
cd /home/debian/chipwhisperer

# Get the current IP address
IP_ADDRESS=$(hostname -I | awk '{print $1}')

# Run the jupyter notebook
jupyter notebook --ip "$IP_ADDRESS" --port 8888 --no-browser
And make it executable:
1
chmod +x run.sh
Now I can easily start the notebook with:
1
./run.sh
Connecting the ChipWhisperer
When connecting the ChipWhisperer-Nano with a USB cable to the Mac, UTM should ask if you want to connect it to the virtual machine if the virtual machine is running.
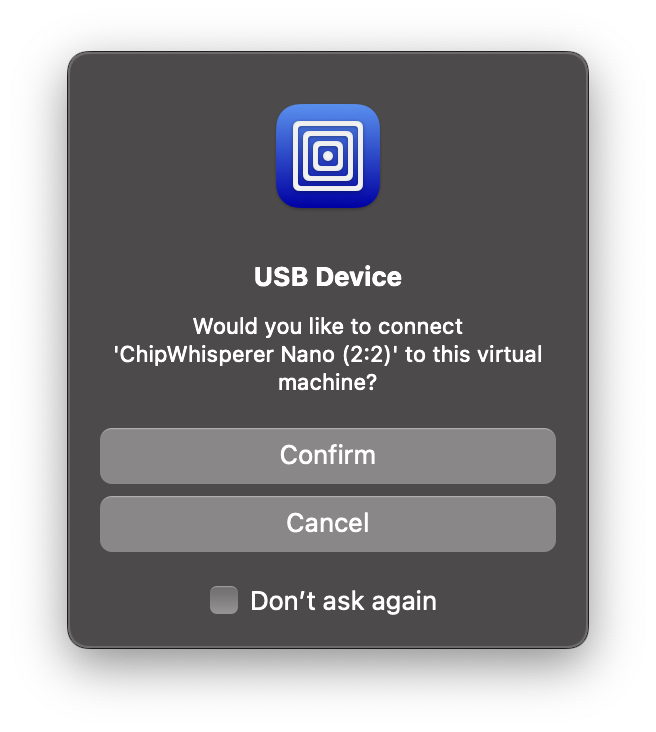 UTM auto connect USB device
Otherwise, we can manually connect it by clicking on the USB icon in the top right corner and selecting the ChipWhisperer.
The notebook that tests for a successful installation now runs without errors.