Increasing the disk space of a VM
Every now and then the disk usage of a virtual machine becomes too large because I add more services to it. Since the disk is just a virtual disk in Proxmox, I can easily increase the disk size of the VM. This however requires some steps inside the VM afterward that I only found in a forum post. Therefore, I wrote this little tutorial with easy to follow steps to increase the disk space of a VM in Proxmox.
Step 1: check the free space
List all connected disks with the following command:
1
sudo fdisk -l
There can be a lot of /dev/loop disks in this output, you can ignore them. In our case we are likely interested in a /dev/sda disk with some partitions listed like this:
1
2
3
4
5
6
7
8
9
10
11
12
Disk /dev/sda: 32 GiB, 34359738368 bytes, 67108864 sectors
Disk model: QEMU HARDDISK
Units: sectors of 1 * 512 = 512 bytes
Sector size (logical/physical): 512 bytes / 512 bytes
I/O size (minimum/optimal): 512 bytes / 512 bytes
Disklabel type: gpt
Disk identifier:

Device       Start      End  Sectors Size Type
/dev/sda1     2048     4095     2048   1M BIOS boot
/dev/sda2     4096  4198399  4194304   2G Linux filesystem
/dev/sda3  4198400 67106815 62908416  30G Linux filesystem
As you can see here we have a 32 GB disk.
If there are multiple drives connected to the VM, it could be that the disk of interest is
/deb/sdbor even has another name.
Step 2: Increase disk size in Proxmox GUI
Open the Proxmox web UI and navigate to the hardware section of the VM. Here you can select the hard disk of which you want to increase the size. Once the disk is selected, resize it by selecting the resize option under disk actions. Input the number of gigabytes you want to increase the disk with in the dialog box that appears
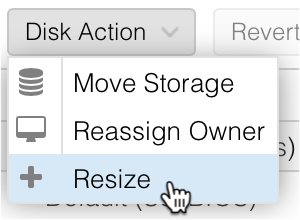 Resize a disk in Proxmox web UI
Step 3: Extend physical drive partition
If you now again list the drives with:
1
sudo fdisk -l
You can see that the drive has increased in size:
1
2
3
4
5
6
7
8
9
10
11
12
Disk /dev/sda: 64 GiB, 68719476736 bytes, 134217728 sectors
Disk model: QEMU HARDDISK
Units: sectors of 1 * 512 = 512 bytes
Sector size (logical/physical): 512 bytes / 512 bytes
I/O size (minimum/optimal): 512 bytes / 512 bytes
Disklabel type: gpt
Disk identifier:

Device       Start      End  Sectors Size Type
/dev/sda1     2048     4095     2048   1M BIOS boot
/dev/sda2     4096  4198399  4194304   2G Linux filesystem
/dev/sda3  4198400 67106815 62908416  30G Linux filesystem
However, you also have to resize the physical drive partition:
1
sudo growpart /dev/sda 3
You can see this physical drive with the command:
1
sudo pvdisplay
Now run the following command to instruct the VM that the disk size has changed:
1
sudo pvresize /dev/sda3
Step 4: Extend logical volume
Next, you need to extend the logical volume. You can find this volume with:
1
sudo lvdisplay
In the output of this command you will find the LV path, which will likely look something like /dev/ubuntu-vg/ubuntu-lv. We need it in the following command to resize the LV:
1
sudo lvextend -l +100%FREE /dev/ubuntu-vg/ubuntu-lv
Where we instruct the VM to extend the LV to all the available disk space. Executing the previous lvdisplay command again, you can see the LV has increased in size.
Step 5: Resize file system
As a last step you need to resize the file system in order for it to be able to use this new disk space:
1
sudo resize2fs /dev/ubuntu-vg/ubuntu-lv
Step 6: Confirm results
Let’s now check the new disk size again with fdisk -l:
1
2
3
4
5
6
7
8
9
10
11
12
Disk /dev/sda: 64 GiB, 68719476736 bytes, 134217728 sectors
Disk model: QEMU HARDDISK
Units: sectors of 1 * 512 = 512 bytes
Sector size (logical/physical): 512 bytes / 512 bytes
I/O size (minimum/optimal): 512 bytes / 512 bytes
Disklabel type: gpt
Disk identifier:

Device       Start       End   Sectors Size Type
/dev/sda1     2048      4095      2048   1M BIOS boot
/dev/sda2     4096   4198399   4194304   2G Linux filesystem
/dev/sda3  4198400 134217694 130019295  62G Linux filesystem
Here we see that we have successfully increased the VM disk size!